はじめに
            
             ホームページデータの転送を例に、FTPサーバーの設定例を紹介します。
             今回は、FTPサーバーとしてProFTPを使用します。
             VineLinuxではFTPサーバーとして、ProFTPが標準でインストールされます。
             設定もわかりやすいので、ぜひ活用しましょう!
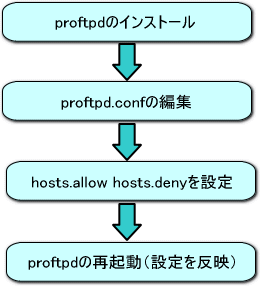
            
             
proftpdのインストール  
            
            
             ・aptコマンドでprftpdのインストールを実行


                   | 
                  
                   [root]# apt-get install proftpd 
                  パッケージリストを読みこんでいます... 完了 
                  依存情報ツリーを作成しています... 完了 
                  * proftpd は既に最新バージョンがインストールされています 
                  0 個のアップグレードパッケージ, 0 個の新規パッケージ, 0 個の削除/リプレースパッ 
                  ケージ, 1 個の保留パッケージがあります。 
                  [root@yu_syun root]# 
                   
                   | 


             すでに最新版がインストールされている場合は、上のようなメッセージがでます。
             インストールは不要ですので、次に進んでください。
             インストールが必要な場合は、インストール実行後に進んでください。


▲proftpd設定手順へ戻る


proftpd.confの編集 
            
            
             まずは、FTPサーバー側で設定する条件を決めます。
             (環境に合わせて設定する条件を検討してください)
            
             ・今回は、FTPサーバー側で設定する条件を以下とします。


                   | 
                   ■FTPサーバーで設定する条件 
                   
                   (条件1):ホームページのアップロードは管理者(admin)ユーザーのみ 
                         その他のユーザーはホームディレクトリのみにアクセス可能とする。 
                   (条件2):Anonymousでは公開しない 
                   (条件3):サーバーにアクセスできるマシンを限定する。 
                   | 
                   
                   | 


              ※(条件3)を有効にする場合は、スーパーサーバー方式を選択します。
                スーパーサーバー方式の場合、TCP Wrapperを介して起動させることによりアクセスできるマシン
                を制限することができます。   
                                                       >>TCP Wrapperの設定 
            
              上記条件に対してproftpd.confの設定を行ってみましょう。
            
             ・proftpd.confの編集
            
              viエディタでproftpd.confファイルを開きます


                   | 
                  
                   [root]# vi /etc/proftpd.conf     [return] 
                   
                   | 


              ※
赤文字の設定項目は必ず確認してください。


                   | 
                   <proftpd.confファイルより抜粋> 
                   
                  # This is a basic ProFTPD configuration file (rename it to 
            # 'proftpd.conf' for actual use.  It establishes a single server 
            # and a single anonymous login.  It assumes that you have a user/group 
            # "nobody" and "ftp" for normal operation and anon. 
             
            #接続の際に表示されるサーバー名です。 
            #接続時のメッセージを記述しない場合、ProFTPDのバージョンと 
            #ここで明記しているサーバー名が表示されます。 
            ServerName "FTP Server 
             
            #アクセス制御の種類 
            ServerType                      standalone   <-スタンドアローン方式 
                  #ServerType inetd      <-スーパーサーバー方式 
                   
                  #デフォルトサーバーが有効 
                  DefaultServer                   on 
                   
                  #接続時のメッセージを記述 
            #セキュリティ上ここは設定していたほうがいいです。 
                  #設定しない場合、FTPのバージョンなどが代わりに表示されます。 
            ServerIdent on "FTP server ready." 
             
            #offに設定すると応答が早くなります。 
            UseReverseDNS off 
            IdentLookups off 
             
            #管理グループ(admin)以外はホームディレクトリ以外アクセス不可 
            DefaultRoot ~ !admin 
             
            #FTPのポート番号を定義(変える必要はありません) 
                  # Port 21 is the standard FTP port. 
                  Port                            21 
                   
                  # Umask 022 is a good standard umask to prevent new dirs and files 
                  # from being group and world writable. 
                  Umask                           022 
                   
                  # Use localtime 
                  TimesGMT                        FALSE 
                   
                  # To prevent DoS attacks, set the maximum number of child processes 
                  # to 30.  If you need to allow more than 30 concurrent connections 
                  # at once, simply increase this value.  Note that this ONLY works 
                  # in standalone mode, in inetd mode you should use an inetd server 
                  # that allows you to limit maximum number of processes per service 
                  # (such as xinetd). 
                  # 最大接続数(このままでいいでしょう) 
                  MaxInstances                    30 
                   
                  # 認証されるまでは以下の権限で動作します 
            User                            nobody 
            Group                           nobody 
             
            # 上書きを許可 
            <Directory /> 
            AllowOverwrite                on 
                  </Directory> 
                   
                  # A basic anonymous configuration, no upload directories. 
                  #Anonymousでは公開しない場合は以下を全てコメントする 
            #<Anonymous ~ftp> 
             
            #  User                         ftp 
            #  Group                                ftp 
             
            # We want clients to be able to login with "anonymous" as well as "ftp" 
            #  UserAlias                    anonymous ftp 
             
            # Limit the maximum number of anonymous logins 
            #  MaxClients                   10 
             
            # do not require shells listed in /etc/shells (user ftp do not have 
            # shell...) 
            #  RequireValidShell       no 
             
            # We want 'welcome.msg' displayed at login, and '.message' displayed 
            # in each newly chdired directory. 
            #  DisplayLogin                 welcome.msg 
            #  DisplayFirstChdir            .message 
             
            # Limit WRITE everywhere in the anonymous chroot 
            #  <Limit WRITE> 
            #    DenyAll 
            #  </Limit> 
             
            #</Anonymous> 
                   | 
                   
                   | 


              ■proftpd.confファイルを編集するポイント
            
               ・アクセス制御方式の選択
            
               FTPサーバーの場合はレスポンスはそれほど重視せずセキュリティを高める意味で
               スーパーサーバー方式で設定するほうが良いように思います。


                   | 
                  (スタンドアローン方式とス-パーサーバー方式の違い) 


                  | アクセス制御 | 
                  スタンドアローン方式 | 
                        スーパーサーバー方式 | 
                       
                
                  | 起動 | 
                  システム起動時から常駐 | 
                        クライアントの要求で起動 
                        (TCPWrapperによる制限可) | 
                       
                
                  | 応答性 | 
                  常駐するので良い | 
                        要求があってから起動するので遅い | 
                       
                
                  | どんなサービス向き? | 
                  WWWサーバーなど常にアクセスが予想されるサーバー | 
                        FTPやTELNETのように頻繁にはアクセスがないようなサービス | 


                   | 


              最後に、proftpd.confの編集内容を保存します。


                   | 
                  
                    :wq <-viエディタだと編集画面でこのように入力(保存して終了) 
                   
                   | 


              ▲proftpd設定手順へ戻る


hosts.allow、hosts.denyの編集
            
            
             この設定は、
スーパーサーバー方式で起動する場合に必要となります。
             スタンドアローン方式で起動する場合は、
proftpdの再起動に進んでください。
            
             ・(条件3)サーバーにアクセスできるマシンを限定する設定を行います。
             
              hosts.allowの設定に以下を追加します。


                   | 
                  
                   in.proftpd: 192.168.0.102 ←IPアドレス(192.168.0.102)アクセスを許可. 
                   
                   | 


              hosts.denyを設定
            
            
             以上の設定を反映さえて、hosts.allow、hosts.denyの設定を保存します。


▲proftpd設定手順へ戻る


proftpdの再起動
            
            
             スーパーサーバー方式とスタンドアローン方式で起動方法が異なります。
            
            
             ■スーパーサーバー方式での再起動
            
              スーパーサーバー方式の場合は、inetd.confの設定を変更する必要があります。
              
               viエディタでinetd.confファイルを開く


                   | 
                  
                   [root#] vi /etc/inetd.conf     [return] 
                   
                   | 


               以下のコメント行を検索して、先頭の#(コメント)を取り除きます。
               (viエディタだと"/検索文字"で検索することができます)


                   | 
                  
                   #ftp stream tcp nowait root /usr/sbin/tcpd in.proftpd 
                  ftp stream tcp nowait root /usr/sbin/tcpd in.proftpd<-先頭のコメント削除 
                   
                   | 


               inetd.confファイルを保存し、以下コマンドでinetdを再起動します。


                   | 
                  
                   [root#] killall -HUP inetd   [return]  
                   
                   | 


              以上で、スーパーサーバー方式での再起動は完了です。


                   | 
                     (アクセス制限の確認方法) 
             
                     ・tcpdmatchコマンドによりTCP Wrapperの設定(アクセス制限)を確認できます。 


                   | 
                  
                   [root@]# tcpdmatch in.proftpd 192.168.0.1   [return] 
                        client: address 192.168.0.1 
                        server: process 
in.qpopper 
                        matched: /etc/hosts.allow line 10 
                        access: granted  ←接続を許可 
                         
                        [root@]# tcpdmatch in.proftpd 192.168.1.1   [return] 
                        client: address 192.168.1.1 
                        server: process 
in.qpopper 
                        matched: /etc/hosts.deny line 10 
                        access: denied   ←接続を拒否 
                   
                         
                         | 


                   | 
                   
                   | 


             ■スタンドアローンサーバー方式での再起動
            
            
              ターミナル上で以下のコマンドを実行します。


                   | 
                  
                   [root]# /etc/rc.d/init.d/proftpd restart    [enter] 
            ↓以下のようなメッセージが出ます ProFTPdを停止中:                                           [  OK  ] 
            ProFTPdを起動中:                                           [  OK  ] 
                   
                   | 


              上記表示がでればスタンドアローン方式での再起動は完了です。


              ▲proftpd設定手順へ戻る


             Copyright(c) 2005, All Rights Reserved.